DIY: Pallet Wall by a Pallet Pro
If you ever enjoy the sensory overload of Instagram or Pinterest then you undoubtedly have seen the beautiful internet sensation: Pallet Wall. Pallet Wall is a great friend to so many trendy and handy designers. If you are about to set out to build your own Pallet Wall then this article is for you.
The internet is filled to the brim with how-to-build-a-pallet-wall articles. However, these articles are very hit or miss. If you want a pallet wall that you are absolutely positive will be gorgeous and worth your time and energy, follow these seven steps. Nothing impresses people more than a properly designed pallet wall put in the proper room and wall of your home or workspace.
You can do this project on a weekend. It only requires intermediate skill with tools, saws, lumber, etc.
First, here are the most fundamental tools you will need:
Pry bar
Saw (Miter works best)
Hammer & Nails (Nail gun works best)
Paint Brush
Tape Measure
Pencil
Ladder
Second, here are the 7-steps to pallet wall greatness:
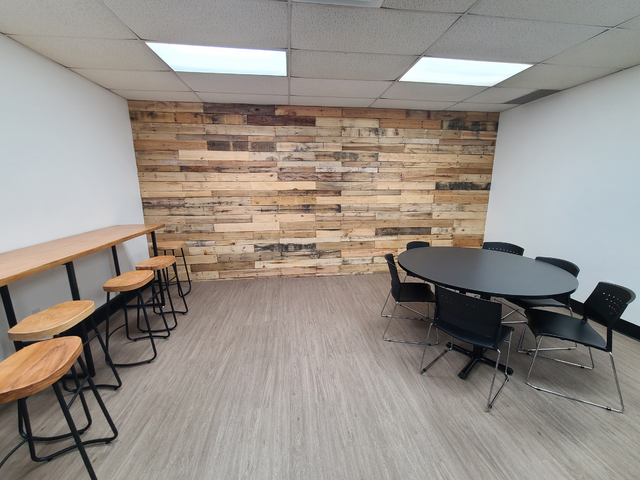
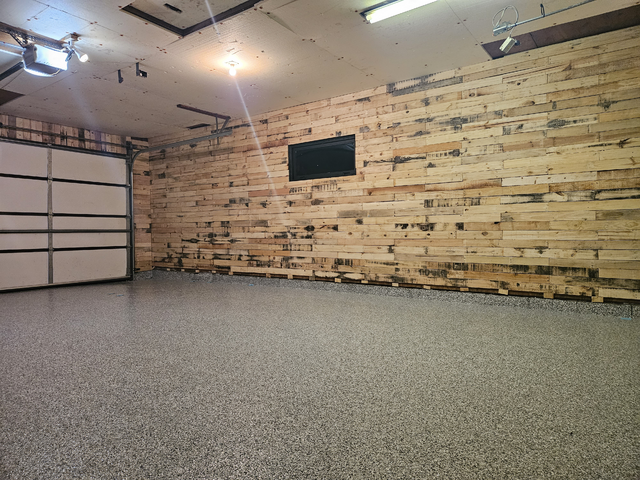
Pick the wall. You probably already have a wall in mind and that is why you are looking for directions to build the pallet wall. However, don’t overlook this step. A pallet wall is a bold look. If you do too much of it, you risk looking like a wood-paneling museum from the ’70s or ’80s. The wall has lots of texture and dimension to it. It is a soft and earthy tone. Look for a wall that would accent the surroundings well in these ways. Most people don’t hang pictures or decorate over the pallet wall so also ensure that the wall you pick is not better suited for a different type of decor.
Paint the wall. “Wait, I thought this was a pallet wall?” Yes, it is. The issue is that pallet boards are low-grade lumber and usually warped or roughly cut. The result is that they don’t fit perfectly snugly to each other - there will be some minor gaps and cracks between the boards. How you hide this reality is you paint your designated wall completely black before you mount the wood. The black color makes it look only like there is a shadow between the wood. Obviously, this is preferred over a bright orange piercing through and distracting the spectators of your wonderful work. Any low-grade paint will do. It doesn’t need to be perfectly painted. Just make the wall black before you start putting the lumber up.
Get the pallet boards. Where do people find pallet boards? As a pallet professional, I spend much of my time answering this question for our own business. There are three possibilities: Home Depot (or Lowes, Menards, etc), a local pallet company, or your own pallet foraging. Hardware stores like Home Depot do sell wood. They even in some cases sell “distressed” wood that looks like pallet lumber. However, it doesn’t quite have the organic charm of truly recycled pallet lumber so I think this is the worst option. The second option, a local pallet company, can be a great option but is not very dependable. Many pallet companies only sell in full 53’ semi-trailer loads at a time and are not able to disrupt their lines to pull a couple of boards out for you. However, you won't know until you ask. Call up a local pallet company and ask if you could get some pallet lumber for a pallet wall. Lastly, and the best option, forage for your own recycled pallet boards. If you drive around some stores in your area, you can go in the back and usually, they have their old junk pallets. Ask the store manager if you can have them. In most cases, they are happy to have them out of the way. So take home the pallets, grab your pry bar and hammer, and start peeling off the boards on those pallets. The pallets don’t need to all be the same size. It works better actually if they aren’t. In all three of these situations, the biggest thing to look for are boards that are a variety of different colors, finishes, thicknesses, and widths. Variety is king.
Plan your layout on the floor. The worst thing you can do is just start nailing boards on the wall without figuring out the best layout. The solution is to lay everything out on the floor exactly the way you want it to look on the wall. First, measure out and mark a space somewhere on the ground that is the exact size of the wall. I used 2x4s to frame my wall on the floor. Second, start laying outboards on the floor so that you will see which boards will need to be cut and which won't. The key here is not having one part of the wall all light yellow colored boards and one part all red boards. Try to make sure the colors and textures are balanced across the entire wall. Push all the boards flush together and put the puzzle together in a way that looks good to you.
Install your pallet wall. Now that you have your pallet wall layout planned you can install it on the black wall. Start at the top of the wall and nail in your boards left to right. At this point, you will need to cut your boards. Have your saw ready and cut as you go. You shouldn’t have to cut the middle pieces - just the boards on both ends. Take your boards and nail them to the wall into the studs. Keep working across and down the wall. Eventually, you will arrive at the bottom. The bottom is the only point where you need to rip the boards down the length of the board rather than the width. I used my table saw for this task. However, any saw works. Rip the boards to fit on the bottom row and stand back in amazement!
Seal it. I don’t think the boards need cleaning or staining. The rustic look of the lumber is part of the appeal. However, you do want to seal the wall with polyurethane so that the boards don’t gray over time and you can clean it better. I got an extremely natural and matte finish polyurethane from the hardware store. Apply the sealant according to the manufacturer's guidelines. Wait for it to dry and repeat a couple of times to ensure you have a nice sturdy coat on the wall.
Enjoy it. Take a picture in front of it and post it on your social media sites. Invite friends over to see it. Look at it and delight. Your work produced something worth being proud of. And now, you finally get to be a true contributor to Pallet Wall’s fame.
And in case you are interested, here are a few walls we have done.